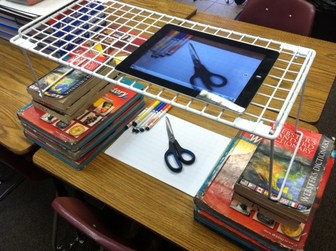
 If you teach in California, maybe you've heard of a not-so-little Twitter chat we like to call #CAedchat. Moderated by nine diverse, passionate, dedicated educators from around the state, it is very exciting to be involved in the growth and development of something that connects educators from across the state every Sunday evening at 8pm Pacific. Last week's chat topic was about the importance of PLNs (Professional Learning Networks) and the necessity of sharing resources, ideas, etc. In light of that, I realized that several people have asked me about how I made the #CAedchat promotional video and I'm not sure a 140 character answer is sufficient. So, I've decided to write this post to help you (or your students) create a video in a similar style. In case you haven't seen it, here is the #CAedchat promo video: 1. Write My first step in creating this video was to write a script - which is also the first thing I have my students do when digital storytelling. I tried to highlight the main points I wanted to share about #CAedchat, it's development, and the important role we hope it will play in the professional lives of educators in California. Then, for each line of the script, I devised an activity that I wanted to be performing on camera at the exact moment each line was read. 2. Film All of this preparation was followed by filming. I decided to film using an iPad. Here's a snapshot of the set-up I used in order to be able to film myself with my iPad as well as be the one drawing/coloring/cutting, etc., in the video. By the way, this is also my "document camera" set up whenever needed. I knew that the nature of this project would involve speeding up the film at an insane rate, so I decided to film the outline of activities in one continuous shot. Positioning the outline next to my right hand, just out of range of the shot was a good call, because I could glance over periodically to ensure that I stayed on track.
3. Edit/Sound Creating the script and outline were one half of the battle, and filming was fairly easy. The real challenge came in post production. Using the iPad for editing was out of the question, since the iPad version of iMovie does not allow you the same versatility with visual effects that the full blown iMovie for iMac provides. After importing the video to iMovie, I quickly recorded the voice-over narration. At first, I attempted to simply speed up the entire video clip at the same rate so that it would last the same duration as the voice-over, but I soon realized that some tasks took longer to accomplish on camera than others, and that a blanket speed wouldn't work. (Otherwise, my outline of what to do as each line was read would be thrown out the window!) The strategy that ended up working best for me was to split the continuous clip into smaller pieces so that I could tailor the speed of each individual activity to match the rate of my voice as I read the script. 4. Share When all was said and done, I exported the finished file in HD and uploaded it to my Vimeo Plus account, then started tweeting like crazy. Making the #CAedchat video was a ton of fun and it's been pretty gratifying to see people share the video on Twitter as a way to promote our state's chat. Bottom line: I never would have thought to make a video like this, if it weren't for such an amazing purpose. I have loved co-moderating #CAedchat and hope that -whether you live in California or not- you'll think about joining us soon on Sunday evening at 8pm Pacific. In the meantime, maybe you'll try out this method of movie-making with your students? If you do, please share a link in the comments below! I'd love to see what your students come up with.
3 Comments
|
Author: Jessica PackCalifornia Teacher of the Year. CUE Outstanding Educator 2015. DIGICOM Learning Teacher Consultant. 6th Grade Teacher. Passionate about gamification, Minecraft, digital story-telling, and fostering student voices. Download:Archives
June 2020
Categories
All
|


 RSS Feed